In our previous blog post we had discussed about What is Action in Salesforce Flow.In these blog post we discuss about How to Create a Flow to Collect Information from Users
Contents
- 1 Flow Collect Information from Users
- 1.1 How to Create a Flow to Collect Information from Users
- 1.1.1 Planning Your Flow
- 1.1.2 Setting Up Salesforce Flow
- 1.1.3 Connecting to Data Sources
- 1.1.4 Implementing Logic
- 1.1.5 Testing Your Flow
- 1.1.6 Deploying the Flow
- 1.1.7 Best Practices for User-Friendly Flows
- 1.1.8 Security Considerations
- 1.1.9 Monitoring and Maintenance
- 1.1.10 Case Study: Successful Flow Implementation
- 1.1.11 Conclusion
- 1.1.12 FAQs
- 1.1 How to Create a Flow to Collect Information from Users
Flow Collect Information from Users
How to Create a Flow to Collect Information from Users
What are Salesforce Flows
Salesforce Flows are a powerful automation tool within Salesforce that enables you to build applications for your business. These applications can automate processes, collect data, and interact with users in a streamlined manner.
Types of Salesforce Flows
There are several types of flows in Salesforce, including:
- Screen Flows: Interact with users through screens and forms.
- Autolaunched Flows: Run automatically based on triggers.
- Scheduled Flows: Execute at specific times.
- Record-Triggered Flows: Launch when records are created or updated.
Planning Your Flow
Defining Objectives
The first step in creating a flow is to define what you want to achieve. Are you looking to collect contact information, feedback, or preferences? Clear objectives will guide the design of your flow.
Identifying Necessary Information
Determine the specific information you need from users. This could include names, email addresses, phone numbers, or any other data relevant to your goals.
Mapping User Journey
Visualize the steps a user will take to provide the required information. Mapping out the user journey ensures a smooth and logical flow.
Setting Up Salesforce Flow
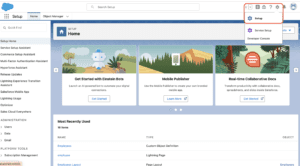
Login to Salesforce Account

Click Gear icon Navigate to Salesforce

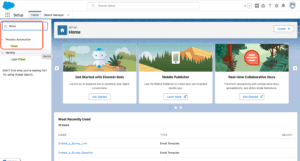
Search Quick find box Flows

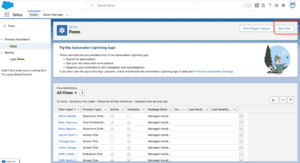
Click New Flow

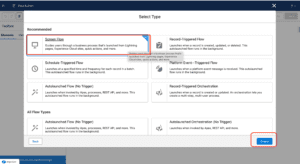
Select Screen Flow

Add a Screen Element
Connecting to Data Sources
Using Data Elements
Incorporate data elements to connect your flow with Salesforce records. This allows you to query, create, or update records based on user input.
Querying Salesforce Records
Use Get Records elements to retrieve existing data from Salesforce. This can be useful for pre-filling fields or checking for duplicates.
Creating and Updating Records
Use Create Records and Update Records elements to save user input into Salesforce. Ensure that your flow handles these operations efficiently and accurately.
Implementing Logic
Decision Elements
Add decision elements to introduce branching logic in your flow. This allows the flow to take different paths based on user input or other conditions.
Assignment Elements
Use assignment elements to set values for variables or update data within the flow. This is useful for calculations or setting default values.
Loops and Collections
Incorporate loops to process multiple records or repeat actions. Collections can store and manage lists of records or values within the flow.
Testing Your Flow
Debugging Flows
Test your flow thoroughly to identify and fix any issues. Use the debugging tools in Flow Builder to step through the flow and observe its behavior.
Running Flow in Debug Mode
Run your flow in debug mode to simulate user interactions and ensure everything works as expected. This helps in catching errors and validating logic.
Analyzing Flow Errors
Review any errors or issues encountered during testing. Use the error messages and logs to diagnose and resolve problems.
Deploying the Flow
Activating the Flow
Once your flow is tested and ready, activate it to make it available for users. Only activated flows can be run by users in your Salesforce organization.
Embedding Flow in Lightning Pages
Embed your flow in Salesforce Lightning pages to make it easily accessible. This can be done using the Lightning App Builder.
Sharing Flow with Users
Share the flow with the relevant users or groups. Ensure they have the necessary permissions to run the flow and access the data.
Best Practices for User-Friendly Flows
Simplifying User Interface
Keep the user interface simple and intuitive. Avoid overloading users with too many fields or complex instructions.
Providing Clear Instructions
Provide clear and concise instructions at each step. This helps users understand what is required and reduces the chance of errors.
Ensuring Mobile Compatibility
Ensure your flow is compatible with mobile devices. Many users access Salesforce on their phones, so a mobile-friendly design is essential.
Security Considerations
Managing User Permissions
Control who can access and run your flow by managing user permissions. This ensures that only authorized users can interact with sensitive data.
Protecting Sensitive Data
Implement security measures to protect sensitive user information. Use encryption, masking, and other techniques to safeguard data.
Logging and Auditing User Actions
Log and audit user actions within the flow. This provides a record of interactions and can help in troubleshooting and compliance.
Monitoring and Maintenance
Tracking Flow Performance
Monitor the performance of your flow over time. Use Salesforce reports and dashboards to track usage and identify any bottlenecks.
Updating Flows Based on Feedback
Gather feedback from users and update your flow accordingly. Continuous improvement ensures that the flow remains effective and user-friendly.
Regular Maintenance Checks
Perform regular maintenance checks to ensure the flow continues to function correctly. This includes checking for updates to Salesforce that might affect the flow.
Case Study: Successful Flow Implementation
Background
A company needed to collect feedback from customers after a support interaction. They decided to implement a Salesforce Flow to streamline the process.
Steps Taken
- Defined the objectives and identified the necessary information.
- Designed a Screen Flow with multiple screens for user input.
- Tested and debugged the flow to ensure it worked as expected.
- Deployed the flow and embedded it in a Lightning page.
Conclusion
Creating a flow to collect information from users in Salesforce is a powerful way to automate data collection and streamline processes. By following the steps outlined in this article, you can design and implement an effective flow that meets your business needs.
We want to more about Flow Collect Information from Users Click Here
FAQs
How do I start a Salesforce Flow?
To start a Salesforce Flow, navigate to the Flow Builder in Salesforce, select “New Flow,” and choose the type of flow you want to create.
Can I automate data collection using flows?
Yes, you can automate data collection using flows by designing interactive screens and using logic elements to process user input.
What types of user input can be collected in a flow?
You can collect various types of user input, including text, numbers, dates, and selections from picklists.
How do I ensure data accuracy in user inputs?
Implement validation rules and conditional visibility to ensure users provide accurate and relevant information.
Is it possible to integrate external data sources with Salesforce Flows?
Yes, you can integrate external data sources with Salesforce Flows using data elements and connectors to retrieve and update data.
In our next blog post we will discuss about Send Table via Email Salesforce Flow

2 thoughts on “How to Create a Flow to Collect Information from Users”