In our previous blog post we had discussed about How to Debug Flow in Salesforce Flow.In these blog post we discuss about How to Call Apex Class in Salesforce Flow
Contents
- 1 What is a Salesforce Flow
- 2 Types of Salesforce Flows
- 3 What is Apex in Salesforce
- 4 When to Call an Apex Class from a Flow
- 5 Benefits of Using Apex Classes
- 6 Prerequisites for Calling an Apex Class
- 7 Creating an Apex Class
- 8 Configuring the Flow
- 8.1 Creating a Variable to Store Apex Class Output
- 8.2 Configuring the Apex Action
- 8.3 Common Issues and Troubleshooting
- 8.4 Deploying Your Flow and Apex Class
- 8.5 Verifying the Deployment
- 8.6 Best Practices for Using Apex with Salesforce Flows
- 8.7 Avoiding Common Pitfalls
- 8.8 Real-World Examples
- 8.9 Automated Email Notifications
- 8.10 Custom Business Logic Execution
- 9 Conclusion
How to Call Apex Class in Salesforce Flow
What is a Salesforce Flow
A Salesforce Flow is a tool within the Salesforce platform that helps automate processes by guiding users through screens or performing actions in the background. Flows can be used to update records, send emails, create tasks, and much more, all without requiring users to write code.
Types of Salesforce Flows
- Screen Flows: These are interactive flows that guide users through a series of screens. They are ideal for use cases where user input is required.
- Auto-Launched Flows: These flows run in the background without user interaction. They are typically triggered by processes such as record changes or platform events.
- Scheduled Flows: These are designed to run at specific times or intervals, useful for tasks like periodic data updates or automated reports.
What is Apex in Salesforce
Apex is a strongly-typed, object-oriented programming language that allows developers to execute flow and transaction control statements on the Salesforce platform’s server. It provides a way to create custom business logic and interact with Salesforce data beyond what’s possible with standard declarative tools.
When to Call an Apex Class from a Flow
Use Cases for Apex in Flows
- Complex Logic: When your Flow requires complex calculations or business logic that can’t be achieved with standard Flow elements.
- Custom Integrations: To integrate with external systems or perform operations that need to interact with external services.
- Batch Processing: For handling large volumes of data or processing records in bulk, which may not be feasible within Flow alone.
Benefits of Using Apex Classes
- Enhanced Functionality: Apex Classes allow you to implement advanced features and logic not available in standard Flow actions.
- Performance Optimization: Apex can handle large datasets and perform operations more efficiently than declarative tools.
- Flexibility: With Apex, you can customize behavior to meet specific business needs that standard Flows might not address.
Prerequisites for Calling an Apex Class
Required Permissions
Ensure you have the necessary permissions to create and manage Apex Classes and Flows. You need the “Author Apex” permission for Apex Classes and “Manage Flows” permission for Flows.
Setting Up Apex Classes
Before calling an Apex Class from a Flow, you need to have the class defined and available in your Salesforce org. This involves writing the Apex code and deploying it to your Salesforce environment.
Creating an Apex Class
Steps to Create an Apex Class
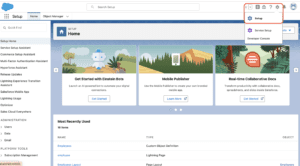
Login to Salesforce Account

Click Gear icon Navigation to Salesforce Setup

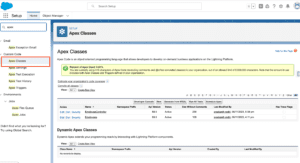
Search Quick Find box in Apex Classes

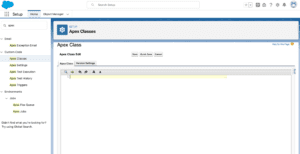
Click New Button

Save and Deploy
Example of a Simple Apex Class
Here’s an example of a simple Apex class that returns a greeting message:
Preparing the Flow to Call Apex Class
Configuring the Flow
- Create a New Flow: Go to Salesforce Setup, search for “Flows,” and create a new Flow.
- Add Variables: Define variables in your Flow to pass data to and from the Apex Class. For instance, create a variable to hold the input and output values.
Creating a Variable to Store Apex Class Output
Define a variable in the Flow to store the result returned by the Apex Class. This variable will be used to capture and utilize the output from the Apex method.
Adding Apex Action to the Flow
Dragging and Dropping the Apex Action
In the Flow Builder, drag the “Apex Action” element onto the canvas. This element allows you to call an Apex Class from within your Flow.
Configuring the Apex Action
- Select the Apex Class: Choose the Apex Class you created from the dropdown list.
- Set Parameters: Configure the input and output parameters for the Apex action, mapping them to the Flow variables you created earlier.
Mapping Flow Variables to Apex Class Parameters
How to Map Input Parameters
Map Flow variables to the input parameters of your Apex method. This ensures that the correct data is passed to the Apex Class for processing.
Setting Up Output Parameters
Map the output of the Apex Class method to a Flow variable to use the result later in the Flow. This step is crucial for utilizing the returned data effectively.
Testing Your Flow with Apex Class Integration
Testing Best Practices
- Run Tests in a Sandbox: Always test your Flow and Apex integration in a sandbox environment before deploying to production.
- Use Debug Logs: Check the debug logs to troubleshoot any issues and verify that the Apex Class is being called as expected.
Common Issues and Troubleshooting
- Apex Errors: Review the Apex debug logs for any errors or issues in the code.
- Flow Errors: Check for errors in the Flow configuration, such as incorrect parameter mappings or missing variables.
Deploying Your Flow and Apex Class
Deployment Steps
- Deploy Apex Class: Ensure that the Apex Class is deployed and available in your production environment.
- Deploy Flow: Activate the Flow and deploy it to your production environment.
Verifying the Deployment
- Test in Production: Verify that the Flow and Apex Class integration works correctly in the production environment.
- Monitor Performance: Monitor the Flow’s performance and ensure that it meets the expected outcomes.
Best Practices for Using Apex with Salesforce Flows
Optimization Tips
- Minimize Apex Calls: Reduce the number of Apex calls within a Flow to improve performance.
- Use Efficient Code: Write efficient and optimized Apex code to ensure that it runs smoothly and quickly.
Avoiding Common Pitfalls
- Handle Exceptions: Implement proper error handling in Apex to manage any issues that arise during execution.
- Check Limits: Be aware of Salesforce governor limits and ensure that your Apex Class adheres to them.
Real-World Examples
Automated Email Notifications
Imagine you need to send customized email notifications based on specific criteria. An Apex Class can generate the email content dynamically and trigger the Flow to send it to the recipients.
Custom Business Logic Execution
For scenarios requiring complex calculations or business logic, such as calculating discounts based on multiple factors, an Apex Class can handle the logic and provide results that the Flow can use to update records or take further actions.
Conclusion
Integrating Apex Classes with Salesforce Flows allows you to extend the functionality of your automation processes. By calling Apex Classes from Flows, you can leverage custom business logic and perform complex operations that enhance your Salesforce workflows. Understanding the prerequisites, configuration steps, and best practices ensures a seamless integration that improves the efficiency and effectiveness of your Salesforce automation.
We want more about How to Call Apex Class in Salesforce Flow Click Here
FAQs
What is the difference between a Flow and an Apex Class?
A Flow is a tool for automating processes and guiding users through steps, while an Apex Class is a custom code that performs advanced logic and operations within Salesforce.
Can Apex Classes be used in all types of Salesforce Flows?
Yes, Apex Classes can be used in Auto-Launched Flows, Screen Flows, and Scheduled Flows, provided they are properly configured and integrated.
How do I handle errors when calling an Apex Class from a Flow?
Implement error handling in your Apex code and use debug logs to troubleshoot and resolve issues that arise during the integration.
Are there limitations on the number of Apex Class calls in a Flow?
While there is no strict limit on the number of Apex Class calls, it’s essential to be mindful of Salesforce governor limits and optimize your code to avoid hitting these limits.
How can I optimize the performance of my Flow with Apex integration?
Optimize your Apex code, minimize the number of calls, and ensure efficient variable usage within the Flow to enhance performance and reduce processing time.
In our next blog post we will discuss about How to Make Callout in Salesforce Flow

2 thoughts on “How to Call Apex Class in Salesforce Flow”